Register people for your webinar from ManyChat DMs with the WebinarStack API
Someone DMs a keyword, ManyChat asks for their email and registers them for your next WebinarStack session over the API. Step by step, with screenshots.
You can register people for a WebinarStack webinar straight from a ManyChat DM. A keyword starts the automation, ManyChat asks for an email, and two External Request steps call GET /sessions for the next session time, then POST /registrations with the email. WebinarStack returns a personal watch link and fires your Registered automations.
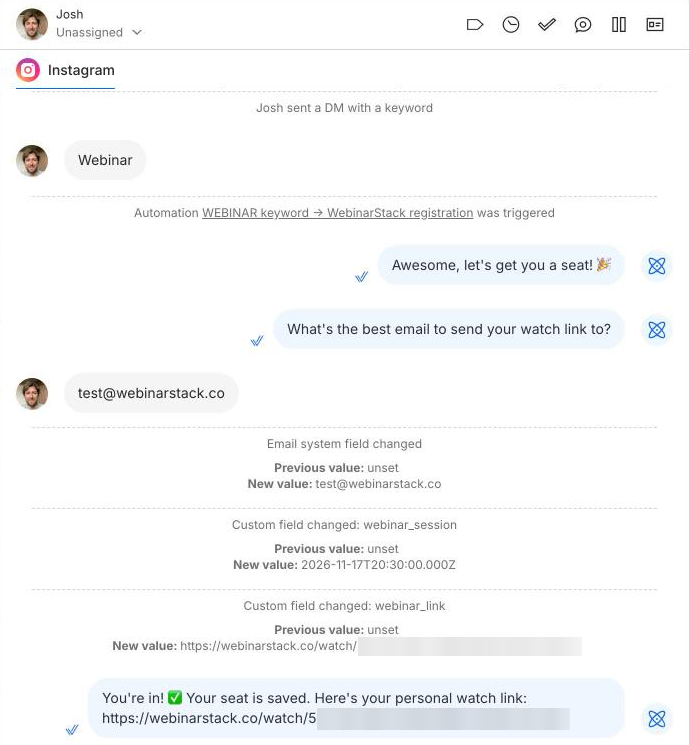
This guide builds that automation by hand, with a screenshot for each step. We built it on 17 November 2026 in a ManyChat Pro account, sent the keyword from a personal Instagram account, and the screenshots are from that run. If you would rather have an AI assistant do the WebinarStack side and write the ManyChat configuration for you, skip to let an AI assistant set it up. You still paste the result into ManyChat yourself, so the manual steps are worth a skim either way.
What do you need before you start?
- A ManyChat plan that includes External Request. It is one of ManyChat's Dev Tools actions and it is not on every plan. Confirm yours includes it on your ManyChat billing page before you build anything, because the whole setup rests on that one action.
- A WebinarStack webinar with at least one upcoming session. Recurring, fixed and just-in-time schedules all work, because the API works out the next open slot for you.
- A WebinarStack API key with two scopes. Step 1 creates it.
- A Registered email automation on the webinar. Step 2 explains why this one is easy to miss.
Step 1: Create an API key for ManyChat
In WebinarStack, go to Settings, open the API Keys tab and click Generate Key. In Key Label, type something you will recognise later, such as "ManyChat webinar sign-ups".
Under Scopes, pick the Custom preset rather than Full access. Custom starts with every box ticked, so clear them first. The grid has one row per resource and a Read, Write and All column: tick Read on the Sessions row and Write on the Registrations row, and leave the rest clear. Under Surfaces, keep REST API on and turn AI Tools (MCP) off. ManyChat only ever makes REST calls, and a key that can do two things is a much smaller problem if it leaks than one that can edit every webinar on your account.
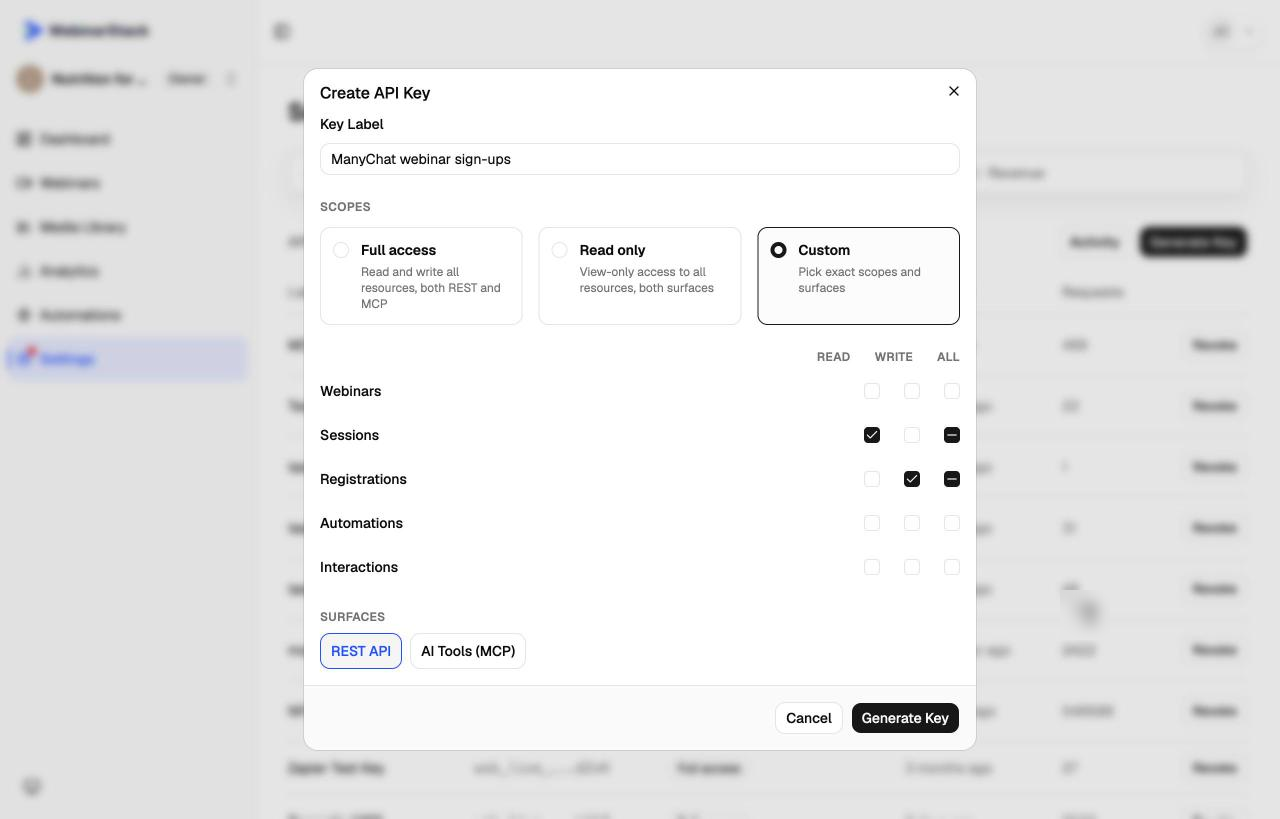
Click Generate Key and copy the key straight away. It starts with wsk_live_, and WebinarStack shows it once: after you close the dialog only a masked hint remains, and a masked hint is not a usable key.
You also need the webinar's ID, the UUID in the address bar when you open the webinar in the editor. Every URL below uses it in place of {webinar_id}.
Step 2: Make sure ManyChat sign-ups get an email
This step is easy to skip and costs you the most if you do. A registration created through the API fires your Registered automations, the same as a registration from your registration page. WebinarStack does not send a confirmation email by itself, though. If the webinar has no Registered email rule, someone who signs up in a DM gets the link in the chat and nothing in their inbox.
Open the webinar, go to its Automations tab and add a rule with the Registered trigger, the Email action and a delay of 0 minutes. Put the Watch link token, {{watch_link}}, in the message: it becomes the attendee's personal link to the session. The Session date and Session time tokens are in the same Insert token menu.
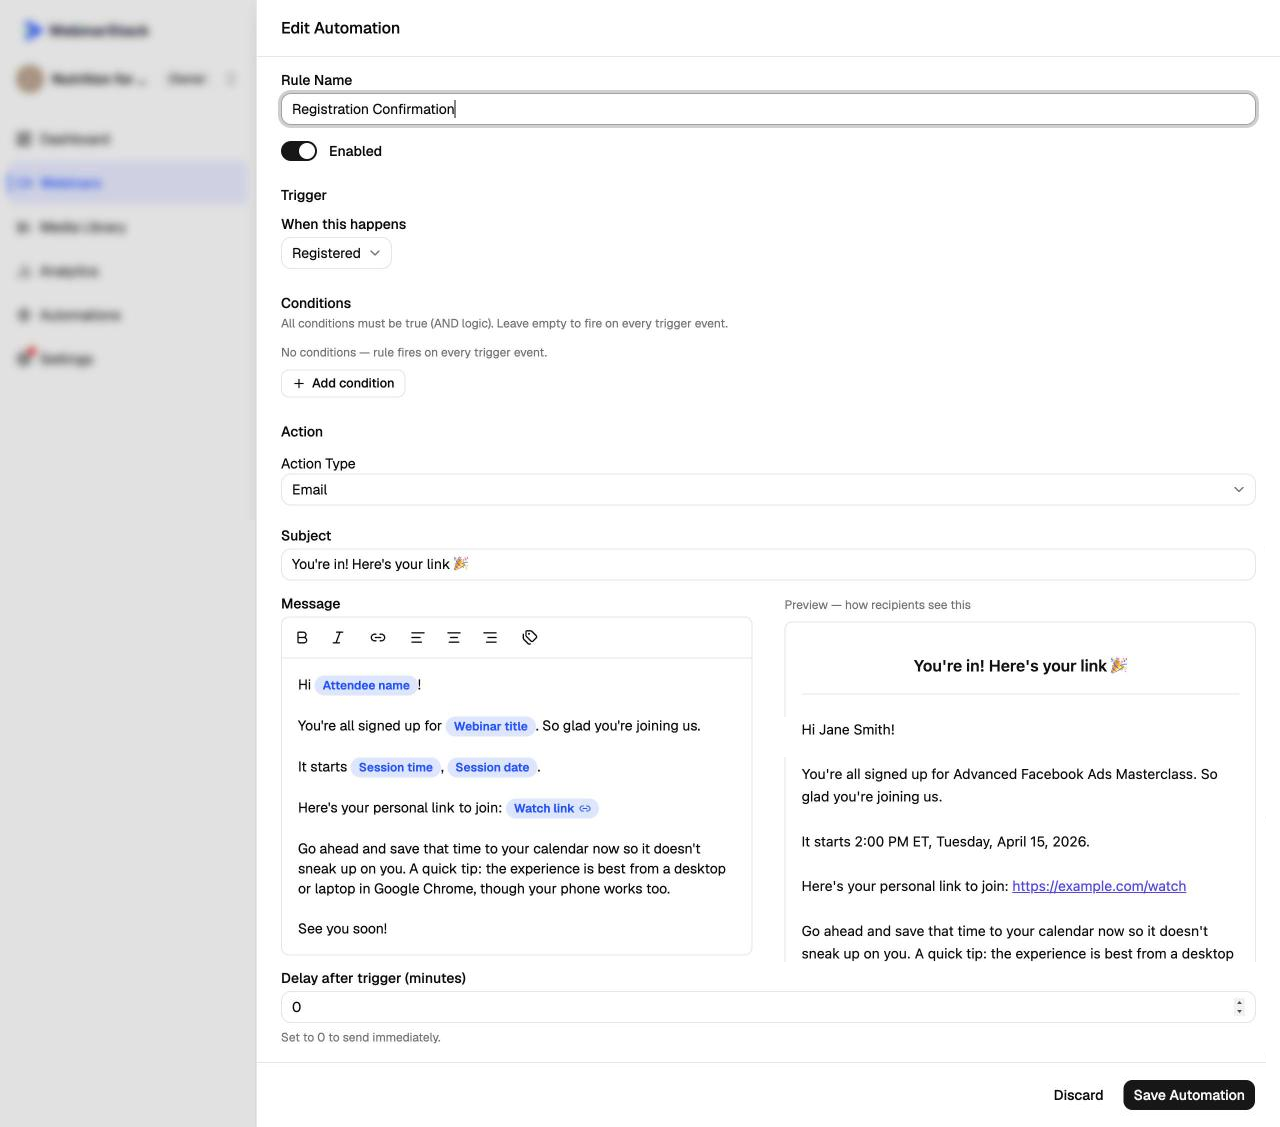
If the webinar already has a Registered email for people who sign up through the registration page, you are done. ManyChat registrations use the same rule.
Step 3: Create two custom fields in ManyChat
The two requests hand data to each other through custom user fields. In ManyChat, open Settings, choose Fields under the Automation heading, stay on the User Fields tab and click New User Field. Create two fields of type Text:
| Field | What it holds |
|---|---|
| webinar_session | The start time of the next session, as the API returns it, for example 2026-12-03T15:00:00.000Z. |
| webinar_link | The attendee's personal watch link, returned when the registration is created. |
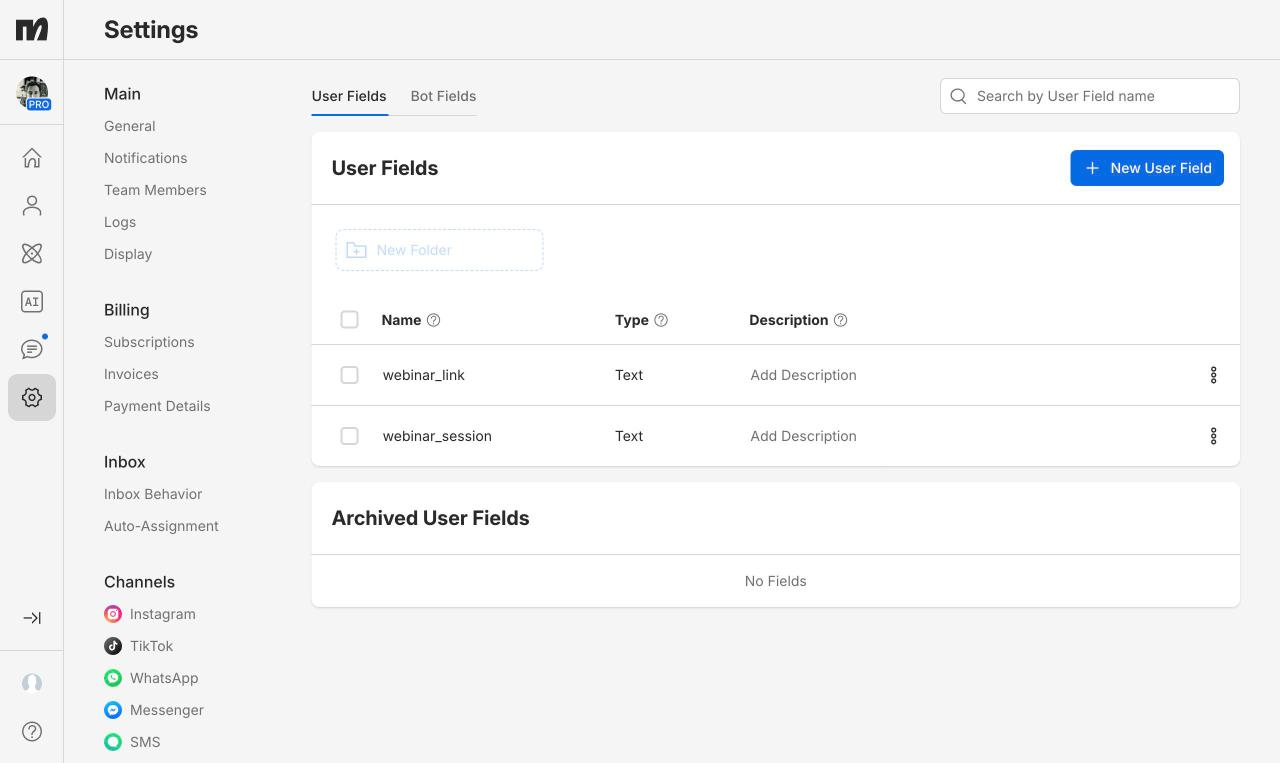
Keep webinar_session as Text even though it holds a time. The registrations API wants the exact ISO 8601 string the sessions API gave you, and passing it through unchanged is the safest way to get it there.
Step 4: Build the automation in ManyChat
In ManyChat, go to Automation, open My Automations, click New Automation, then Start From Scratch and Start from a blank canvas. The automation has four parts:
- A trigger. Click New Trigger, choose Instagram Message: User sends a message, then Detect specific words in a message. We used Message is with the keyword
WEBINAR, so only that exact word starts it. ManyChat notes that keywords are not case-sensitive. - A message that asks for an email. In a Send Message step, add a greeting, then a question such as "What's the best email to send your watch link to?", then a Data Collection block. Click its Contact's reply chip, set Reply Type to Email and leave Save Email to System Field on. Set Email Opt-In is on by default and shows a consent notice. We turned it off, since we only needed the address for the registration; decide that one for yourself.
- An Actions step with the two External Request actions. In the same Data Collection panel, under Actions on successful input, choose Perform Actions. That creates an Actions step already wired to the question's Action on reply output. Add the two requests in it, in order. Steps 5 and 6 cover them.
- A message that confirms the seat. Hang a second Send Message step off the question's Next Step output, not off the Actions step: an Actions step made this way has no Next Step output of its own. In our run ManyChat waited for both requests to finish before sending it.
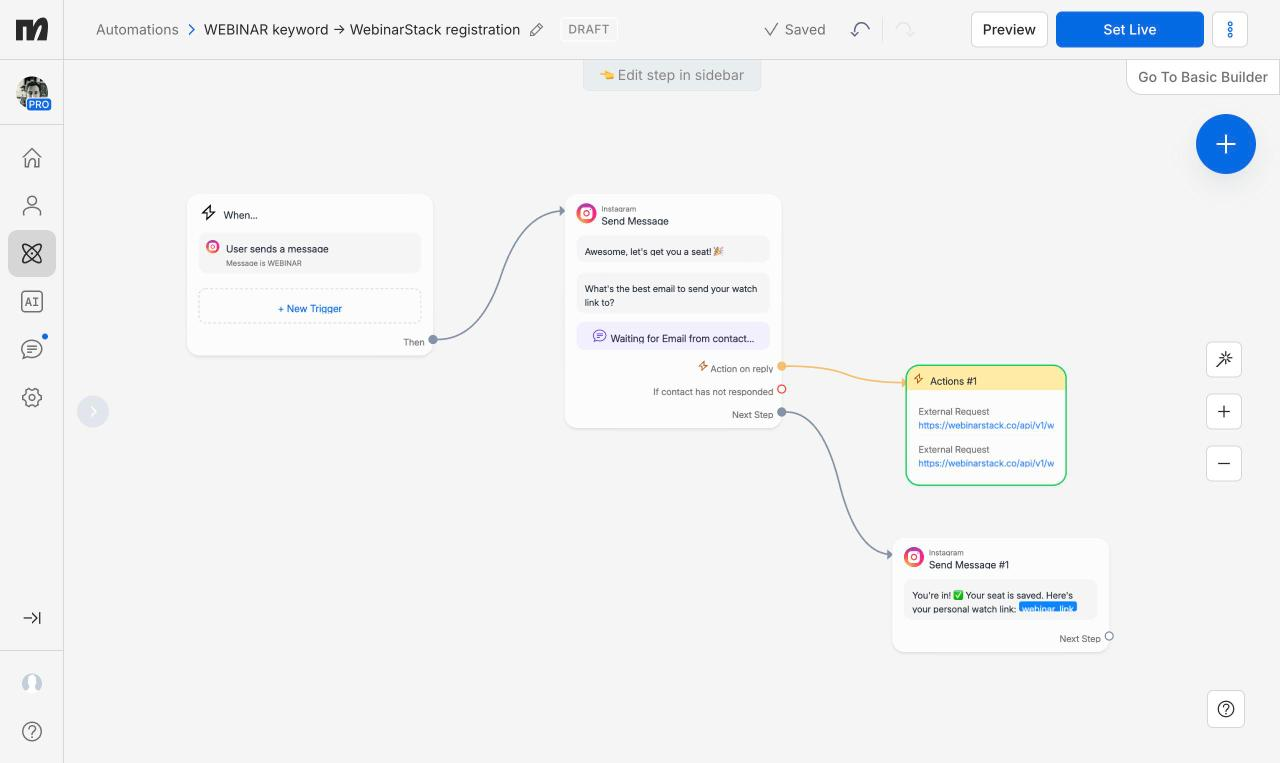
Write the confirmation as "You're in! Your seat is saved. Here's your personal watch link:" followed by the webinar_link field, which you insert from the picker under Custom User Fields.
Step 5: First request, find the next session
Inside the Actions step, add an External Request action and click Add your request. This request asks WebinarStack for the next session that is open for registration.
- Request type:
GET - URL:
https://webinarstack.co/api/v1/webinars/{webinar_id}/sessions?limit=1 - Header:
Authorizationwith the valueBearerfollowed by your key, with one space between them.
In Response mapping, save the JSON path $.data[0].startsAt to the webinar_session field.
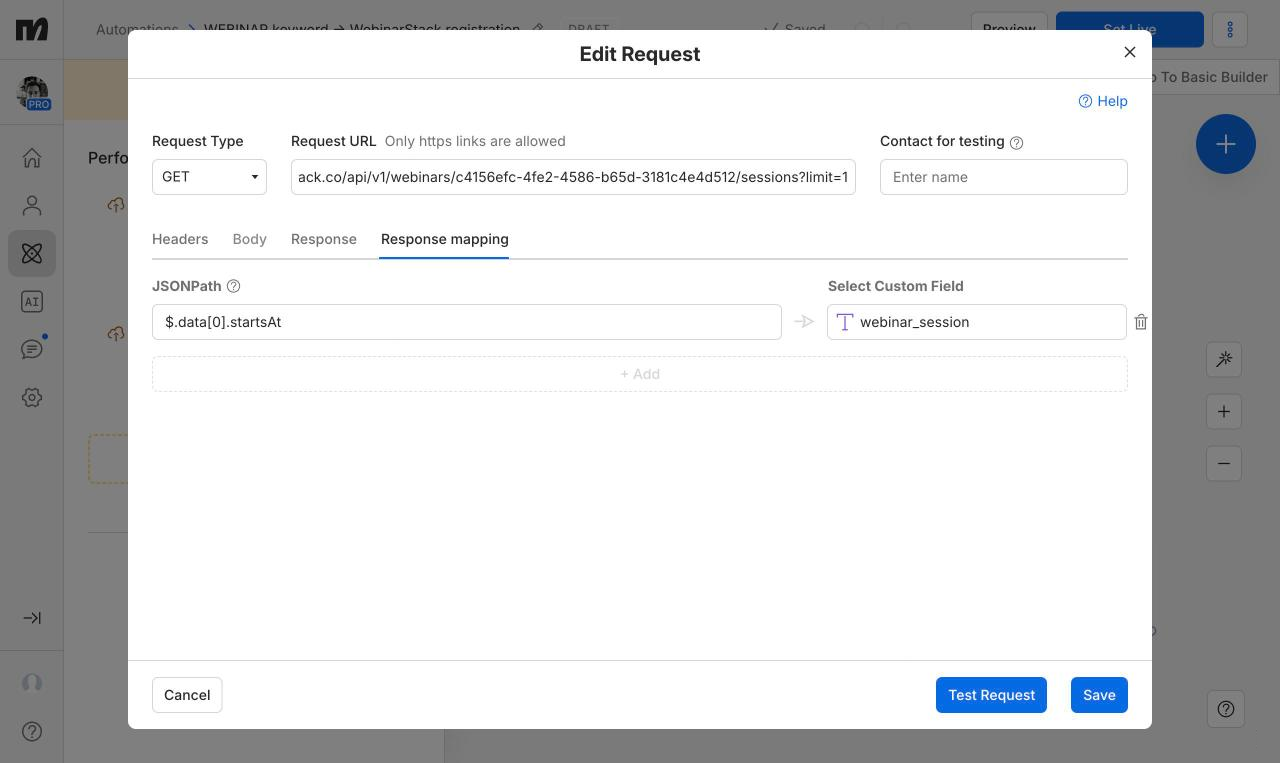
The API returns sessions in time order and only includes slots that are still open for registration, so the first item is always the right one. For a just-in-time webinar that can be a slot a few minutes away, which is the point of that schedule type.
ManyChat's Test Request button needs a Contact for testing. In our account the contact search returned no results for any query, even for a contact who had just messaged us, so we could not run it and tested with the live automation in step 7 instead. If yours works, a good run returns a 200 and a list with one session.
Step 6: Second request, register the attendee
Add a second External Request action below the first.
- Request type:
POST - URL:
https://webinarstack.co/api/v1/webinars/{webinar_id}/registrations - Headers: the same
Authorizationheader, plusContent-Typewith the valueapplication/json.
In Body, paste this JSON:
{
  "email": "{{Email}}",
  "name": "{{First Name}}",
  "sessionTime": "{{webinar_session}}",
  "utmSource": "manychat",
  "utmMedium": "instagram-dm",
  "utmCampaign": "dec-training"
}
Then replace the three placeholders in double braces with ManyChat's field picker (Add a Field), so ManyChat inserts its own reference to the Email system field, the first name and your webinar_session field. Keep the quotation marks around each one, because every value in this body is a string. If you may not have a first name, delete the name line: WebinarStack rejects an empty string for name, so a blank first name would fail the whole registration. We did not test a blank first name in ManyChat.
In Response mapping, save $.data.accessUrl to the webinar_link field.
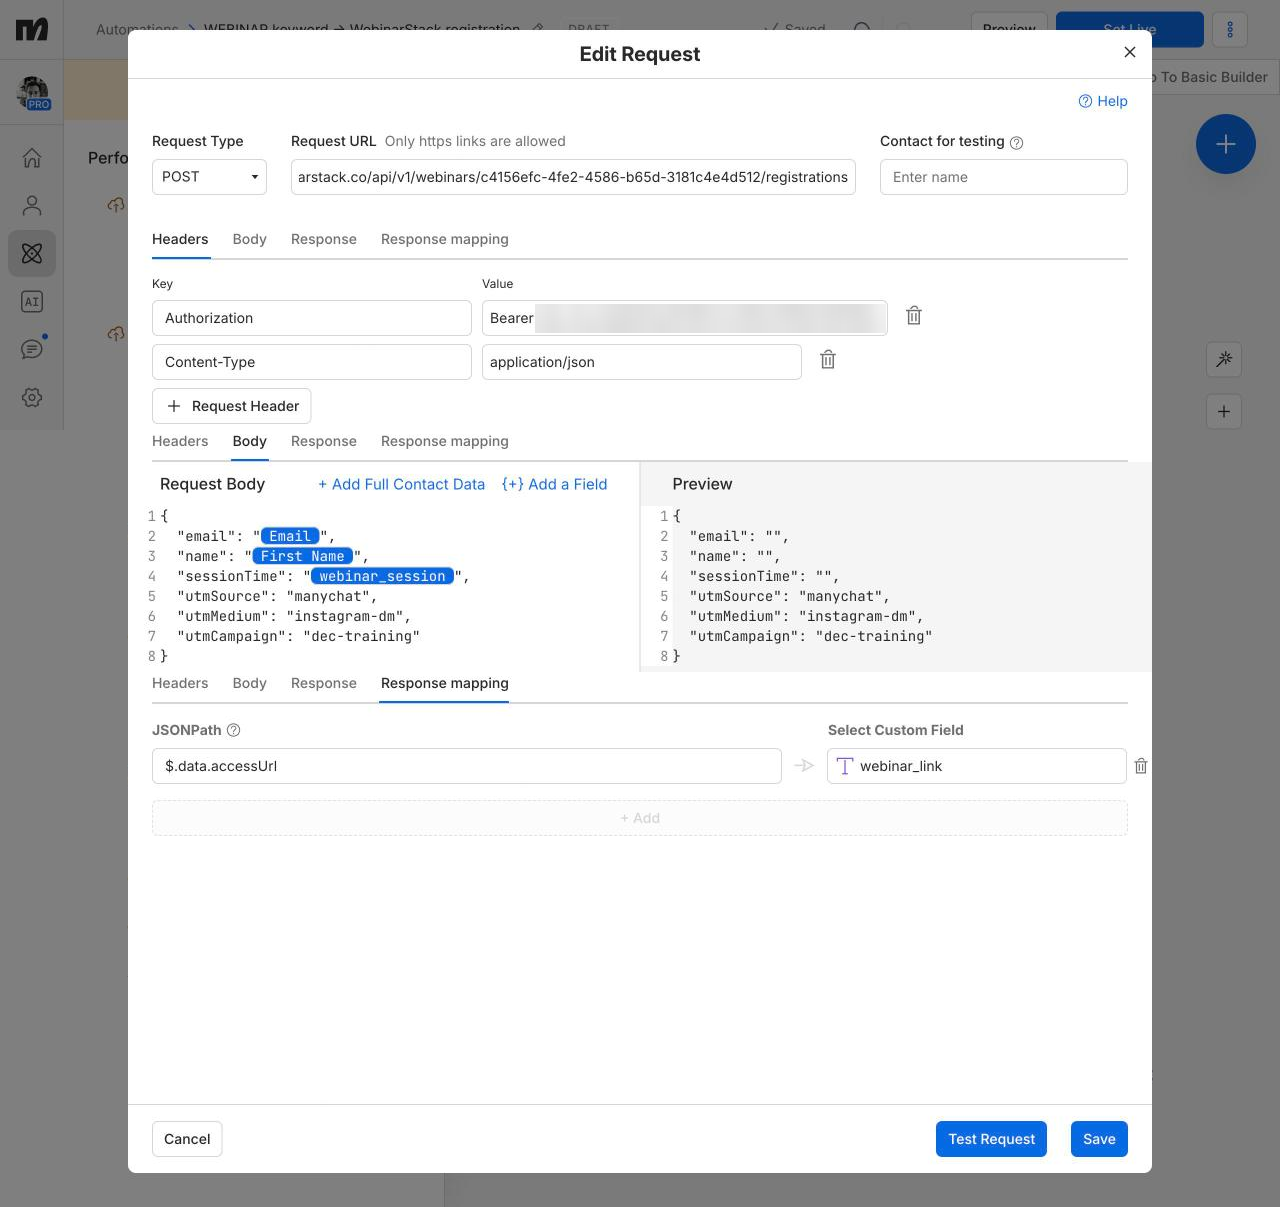
What each field does:
| Field | Required | Notes |
|---|---|---|
| email | yes | Must be a valid email address, or the request is rejected. |
| sessionTime | yes | An ISO 8601 time with a timezone. Pass the value from the first request unchanged. |
| name | no | 1 to 200 characters. Leave the line out if you may not have a name; an empty string is rejected. |
| utmSource, utmMedium, utmCampaign | no | Up to 200 characters each. Set them, because they are how you tell DM sign-ups apart from registration page sign-ups later, on the webinar's UTM Attribution analytics tab. |
sessionTime is the field that goes wrong quietly. WebinarStack checks that it is a valid time but, as of 17 November 2026, does not check that a session starts at that moment. Typing a time by hand instead of using the field from the first request registers people for a session that does not exist.
A successful registration returns 201 Created with the new registration's details inside data, including accessUrl, the attendee's personal watch link. ManyChat maps fields from that 201 response without trouble: in our run the contact's activity log shows webinar_session and then webinar_link being set before the confirmation message went out.
Step 7: Set it live and test it on yourself
Click Set Live. ManyChat holds any later edit as an unpublished change until you click Update, so remember to do that after each change.
Test it from a personal Instagram account that is not the business account, the way an attendee would:
- DM the keyword and give an email address you can check.
- Check the reply. If it shows a link starting
https://webinarstack.co/watch/, the mapping works. In ManyChat's inbox the contact's history should list the Email field changing, thenwebinar_session, thenwebinar_link, then the confirmation message. - Open the webinar's analytics in WebinarStack and check the Attendees tab. The new registration should be there.
- Check the inbox. The Registered email from step 2 should arrive with the same link.
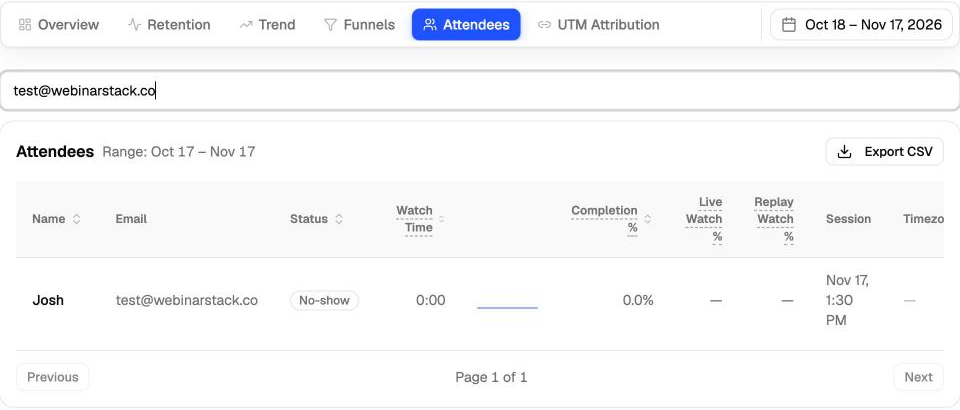
How do you stop double registrations?
The registrations API creates a new registration on every call. It deliberately does not merge repeats, so someone who sends the keyword twice is registered twice and gets two confirmation emails.
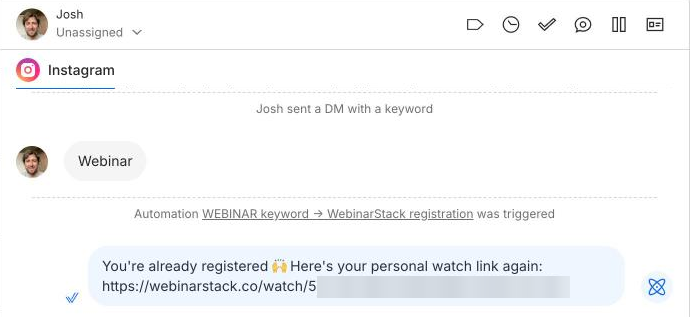
This guard lives in ManyChat, not WebinarStack. Add a Condition step between the trigger and the email question that checks whether webinar_link has any value. If it does, send the saved link again and stop. If it does not, carry on to the email question. In our test the second DM got the "You're already registered" message with the same link straight away, and WebinarStack still showed one registration.
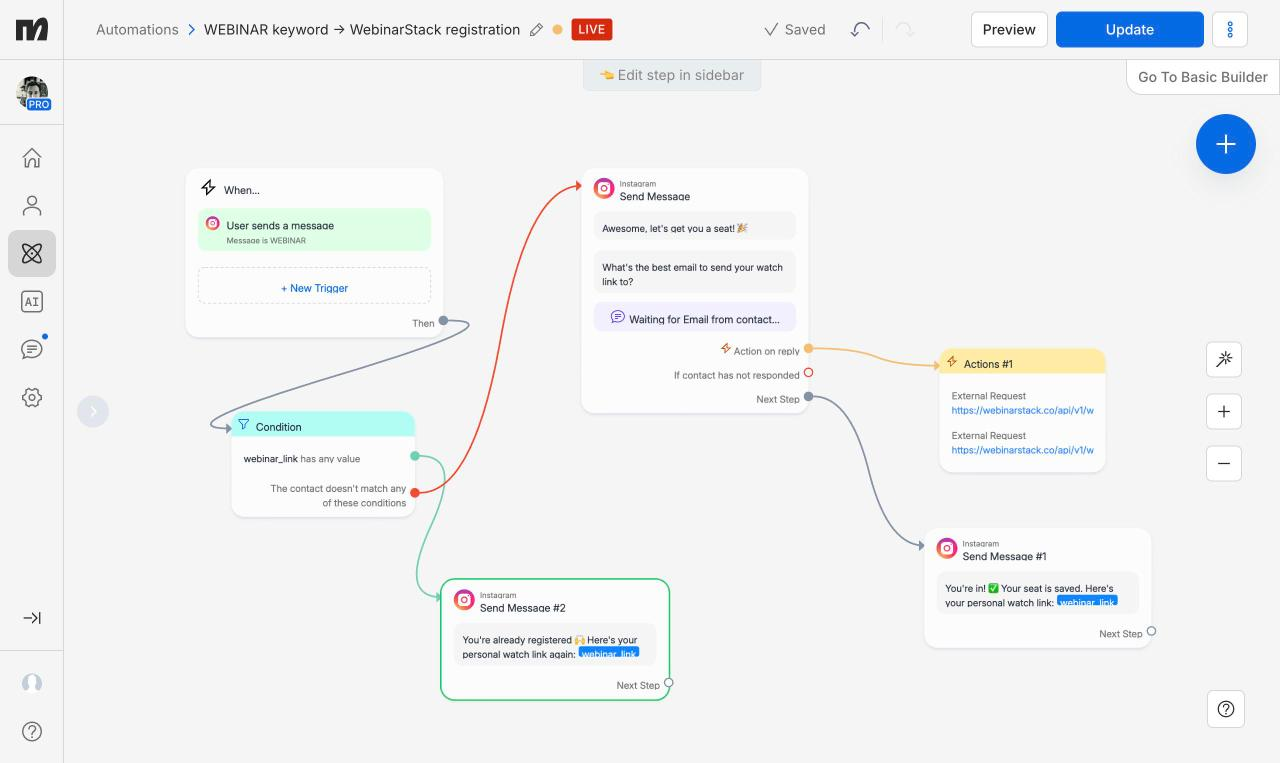
webinar_link stays on the contact, so this guard also stops someone registering for a later session. If you run the same keyword across several sessions, clear the field when a session ends or use a separate field for each campaign.
For a second layer, add an Idempotency-Key header to the POST request built from the email and the session time, for example {{Email}}-{{webinar_session}} inserted with the field picker. WebinarStack remembers each key for 24 hours. A repeat with the same key and the same body returns the original response instead of creating a second registration, and a repeat with the same key and a different body is rejected with a 409. We checked this behaviour in the API, not inside ManyChat.
What if a request fails?
Start with the contact's history in ManyChat's inbox. It logs each field change, so a missing webinar_link line means the registration request did not return a link. The confirmation message can still go out with an empty link. A Condition after the question's Next Step that checks webinar_link has any value fixes that: send the link if it does, otherwise say "We couldn't register you, reply WEBINAR to try again". We have not built that branch ourselves.
To read the actual status, run the request with Test Request or from any HTTP client, and match the code:
| Status | What it means |
|---|---|
| 400 | The body failed validation. Usually email is not a valid address, or sessionTime is empty because the first request did not fill webinar_session. |
| 401 | The key is wrong, revoked or missing the word Bearer. The registration request also returns 401, not 403, when the key lacks Registrations: Write, and every request returns 401 if the key has REST API turned off, so check the key settings from step 1. |
| 404 | The webinar ID in the URL is wrong, or the webinar was deleted. |
| 409 | An Idempotency-Key was reused with a different body, or the first request with that key is still being processed. |
| 429 | Rate limited. The limit is 300 requests a minute per account, shared across the REST API and the MCP server, and each sign-up uses two requests, so a post that goes viral can hit it. |
Keep the key out of anything you share. If you send a screenshot of the request to anyone, ManyChat support included, crop or blur the Authorization header first, and if it ends up somewhere public, revoke it in WebinarStack and generate a new one.
Let an AI assistant set it up with the WebinarStack MCP server
WebinarStack runs a remote MCP server, so an assistant such as Claude can work on your webinars by conversation. For this automation, it handles everything on the WebinarStack side and writes out the ManyChat configuration for you to paste.
Connect the assistant
- In WebinarStack, open Settings, go to the AI Tools tab and create an MCP key with Create MCP key (the button reads Create new MCP key if one already exists). This key is separate from the ManyChat key in step 1, and this tab has no scope picker: it issues one key with every scope, on the AI Tools (MCP) surface only, so it cannot make the REST calls ManyChat makes. Creating a second key does not revoke the first, and the AI Tools tab only ever shows the newest one — if you are replacing a key, revoke the old one from the API Keys tab, which lists every key on the account.
- On the same tab, pick your client in the Client menu and copy the configuration it generates. For Claude it looks like this, with your key stored in the
WEBINARSTACK_API_KEYenvironment variable:
{
  "mcpServers": {
    "webinarstack": {
      "type": "http",
      "url": "https://webinarstack.co/api/mcp",
      "headers": {
        "Authorization": "Bearer ${WEBINARSTACK_API_KEY}"
      }
    }
  }
}
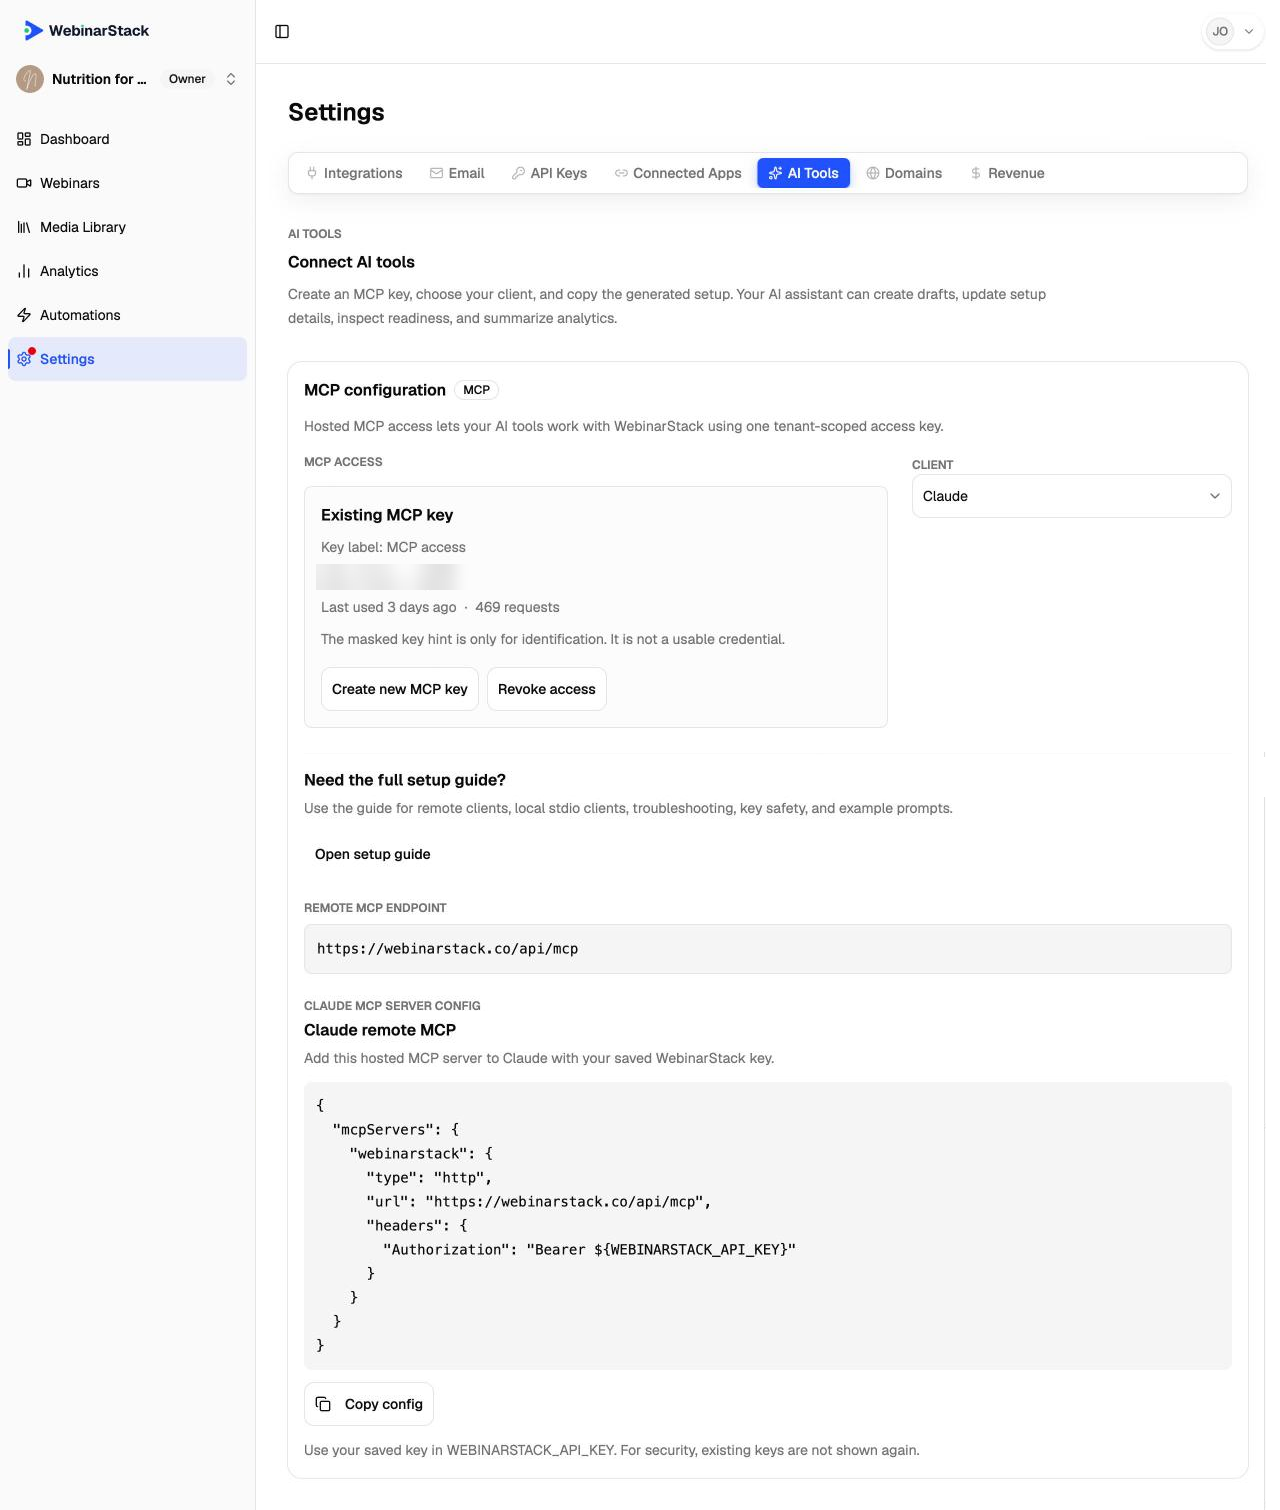
The page never shows an existing key again, so keep a copy of the key when you create it. The MCP server guide covers the connection in more detail, including what the server is not allowed to touch.
Paste this prompt
Swap in your webinar's name, keyword and channel:
I want people who DM "WEBINAR" on Instagram to be registered for my
"7-Day Meal Prep" webinar through ManyChat, using the WebinarStack
registrations API.

1. Find the webinar and its next upcoming session.
2. Check its automations for a Registered email. If there isn't one,
   create one with no delay called "Your seat is saved" that includes
   {{watch_link}}, {{session_date}} and {{session_time}}.
3. Then write out exactly what I should put in ManyChat: the two External
   Request actions (method, URL, headers, body, response mapping JSON
   paths), the two custom fields to create, and a Condition step that
   stops double registrations. Leave the API key as a placeholder.
What the assistant does
- Looks up the webinar with
webinarstack.webinars.listand fills in the real webinar ID, so you never copy a UUID by hand. - Confirms there is an upcoming session with
webinarstack.webinars.upcoming_sessions. A webinar with no open sessions would make the first ManyChat request return an empty list. - Reads the webinar's rules with
webinarstack.webinars.automations_listand, if there is no Registered email, creates one withwebinarstack.workflows.configure_automation_sequence. That is step 2, the one most likely to be forgotten. - Writes out both External Request configurations with your real webinar ID already in the URLs.
The guide to building an email sequence with AI shows what else that tool can do, if you want reminders and follow-ups for DM sign-ups as well.
What it cannot do
- Create the ManyChat key. No MCP tool creates API keys. You make the key in step 1 and paste it into ManyChat yourself. Never paste a key into the chat with the assistant.
- Log in to ManyChat. The WebinarStack MCP server only reaches WebinarStack. You paste the assistant's configuration into the two External Request actions.
- Test the whole flow for you. The MCP server has a
webinarstack.webinars.create_test_registrationtool, but it writes the registration directly and does not fire Registered automations, so it cannot tell you whether the confirmation email works. The real test is step 7: DM the keyword from your own account.
To load an existing list of registrants instead of signing people up one DM at a time, use the bulk registrations API.
Frequently asked questions
- Do I need a paid ManyChat plan for this?
- Probably. External Request is one of ManyChat's Dev Tools actions and it is not included on every plan. We built and tested this setup on a ManyChat Pro account. Open your ManyChat billing page and confirm your plan includes it before you build, because the whole setup depends on that one action. If you cannot find External Request at all, that is the usual reason.
- Will people registered through ManyChat get my confirmation email?
- Only if the webinar has an automation rule with the Registered trigger and an email action. A registration created over the API fires your Registered automations exactly like the registration page does, but WebinarStack does not send a confirmation email on its own. Add one Registered email with the watch link in it and every ManyChat sign-up receives it.
- What happens if someone sends the keyword twice?
- Without a guard, they are registered twice and get two confirmation emails, because the registrations API creates a new registration on every call. Add a Condition step in ManyChat, right after the trigger, that checks whether the contact's webinar_link field already has a value. If it does, send the saved link instead of calling the API again.
- Can an AI assistant build the whole thing for me?
- It can do the WebinarStack half and write the ManyChat half for you. Connected through the WebinarStack MCP server, an assistant can look up your webinar ID and next session and create the Registered confirmation email. It cannot create API keys or log in to ManyChat, so you paste its configuration into the two External Request steps yourself.
- Does this work for Messenger and WhatsApp as well as Instagram?
- The WebinarStack side is the same for every channel, because the API only sees an email address and a session time. We built and tested this on Instagram DMs only. External Request is an action in ManyChat's automation builder, so the same two requests should work wherever you can collect an email, but test it on your own channel before you rely on it.